
01
Make the master pattern
Create a master with the required geometry and surface using 3D printing, CNC machining or another suitable method.
Discuss the master, casting resin and first-part checks with Aria before making your prototype batch.
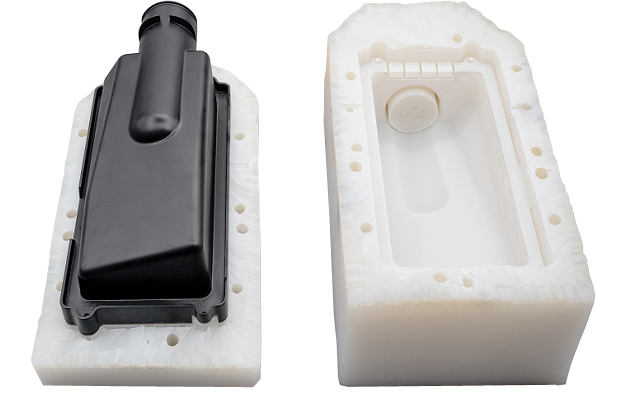


















When one model is not enough for appearance or assembly checks, Aria offers vacuum casting as a small-batch option before production tooling. We review the master, resin and important mating dimensions together, so the parts are planned around the evaluation you need to carry out.
The master’s surface and the chosen casting resin affect the result you receive. We can discuss rigidity, flexibility or clarity with your test requirements, then review injection molding when repeat demand justifies it. A casting resin described as ABS-like or rubber-like is selected for particular behavior; it is not the same material as the corresponding production plastic.
Liquid casting resin cures inside a silicone mold made from a master pattern. The master and resin determine the reproduced shape and surface.
| Items | Descriptions |
|---|---|
| Wall Thickness | The minimum wall thickness for vacuum casting depends on the material used, but both thin and thick walls can be designed in the same part without affecting the final component. This allows for greater design flexibility. However, it is recommended to maintain consistency, and at Aria, we suggest a minimum wall thickness of 1mm as a good practice. |
| Boss Wall Thickness | Larger or heavier fasteners will require thicker boss walls to provide sufficient strength. Bosses should have a minimum height and diameter of 1mm, and their wall thickness should be no more than 60% of the nominal thickness to prevent sinking. |
| Ribs | As a general rule, the height of the rib should be no more than three times the wall thickness of the part, and the thickness of the rib should be no more than half of the wall thickness. the distance between ribs should be no more than twice the height of the rib. |
| Undercuts | To avoid difficulties in removing the part from the mold in vacuum casting, it’s best to avoid undercuts whenever possible. If they are necessary, plan for them during the design phase by considering the direction of part removal from the mold and incorporating slides or lifters, if possible. |
| Embossed Details | When designing for embossed details, it’s important to ensure that the details are large enough to be cast accurately, typically no less than 0.5mm in depth and width. The details should also be designed with draft angles to enable easy removal from the mold. |
Low-volume polyurethane / plastic parts cast using silicone molds.
Create a master with the required geometry and surface using 3D printing, CNC machining or another suitable method.
Form a flexible mold around the master, then remove the master to leave the part cavity.
Mix the selected two-part casting resin according to its processing requirements.
Fill the mold with resin under vacuum to help remove trapped air.
Allow the resin to cure under the temperature and time conditions required by the selected material.
Open the silicone mold and remove the cured part.
Remove excess material and complete the specified surface finishing.
Check the finished parts against the agreed dimensions, appearance and other acceptance requirements.
Master accuracy, resin shrinkage and part geometry affect the result. Identify mating dimensions for inspection on the first cast parts before continuing the run.
Select a casting resin for rigidity, flexibility, clarity and the intended test environment. An ABS-like or rubber-like description refers to selected behavior, not identical chemistry.
Mark close fits, thin sections and cosmetic surfaces on the drawing. Confirm which dimensions are acceptance criteria for the selected casting resin and geometry.
The master establishes the reproduced geometry and surface. Review parting lines, resin access and thin sections, then check important mating dimensions on the first cast parts.
The finished master provides the geometry and surface reproduced by the silicone mold. Master preparation is therefore part of the casting quality plan.
When a casting is intended to resemble a PVC component, specify the required flexibility and use conditions. A substitute casting resin must be assessed against those requirements; it is not automatically PVC.
The master, silicone mold and resin determine the practical casting plan. Include part size, quantity and cosmetic expectations when requesting a review.
A: Centrifugal casting involves pouring molten metal or plastic into a spinning mold, which uses centrifugal force to distribute the metal evenly throughout the mold. Vacuum casting is better suited for smaller and more intricate parts, while centrifugal casting is better suited for larger and simpler parts.
A: It depends on your specific needs and budgets. Some popular options include Formlabs Form 3B, the Stratasys V650 Flex, and the Renishow RenAM 500Q. Factors to consider when choosing a machine include accuracy, speed, material compatibility, cost and ease of use. Click the following button to get Your Free Quote About Plastic Vacuum Casting Services Today. Get Vacuum Casting Quotes Online All information and uploads are secure and confidential.
A: we can provide design assistance, tooling fabrication, and production services as well as post-processing and finishing operations. Additionally, we will work with you on material selection and help ensure that quality standards are met throughout the entire process.
A: The choice between the two methods depends on budget, production volume, and product complexity. Vacuum casting is better suited for producing small quantities of complex parts with fine details, while injection molding is ideal in large production runs for simple parts.
Upload your CAD files and tell us the material and quantity you need.
Talk to an engineer